WINERED observation is conducted via three UIs called as command launcher, status monitor, and slit viewer (If you cannot find these UIs being active, the WINERED team will start them up.).
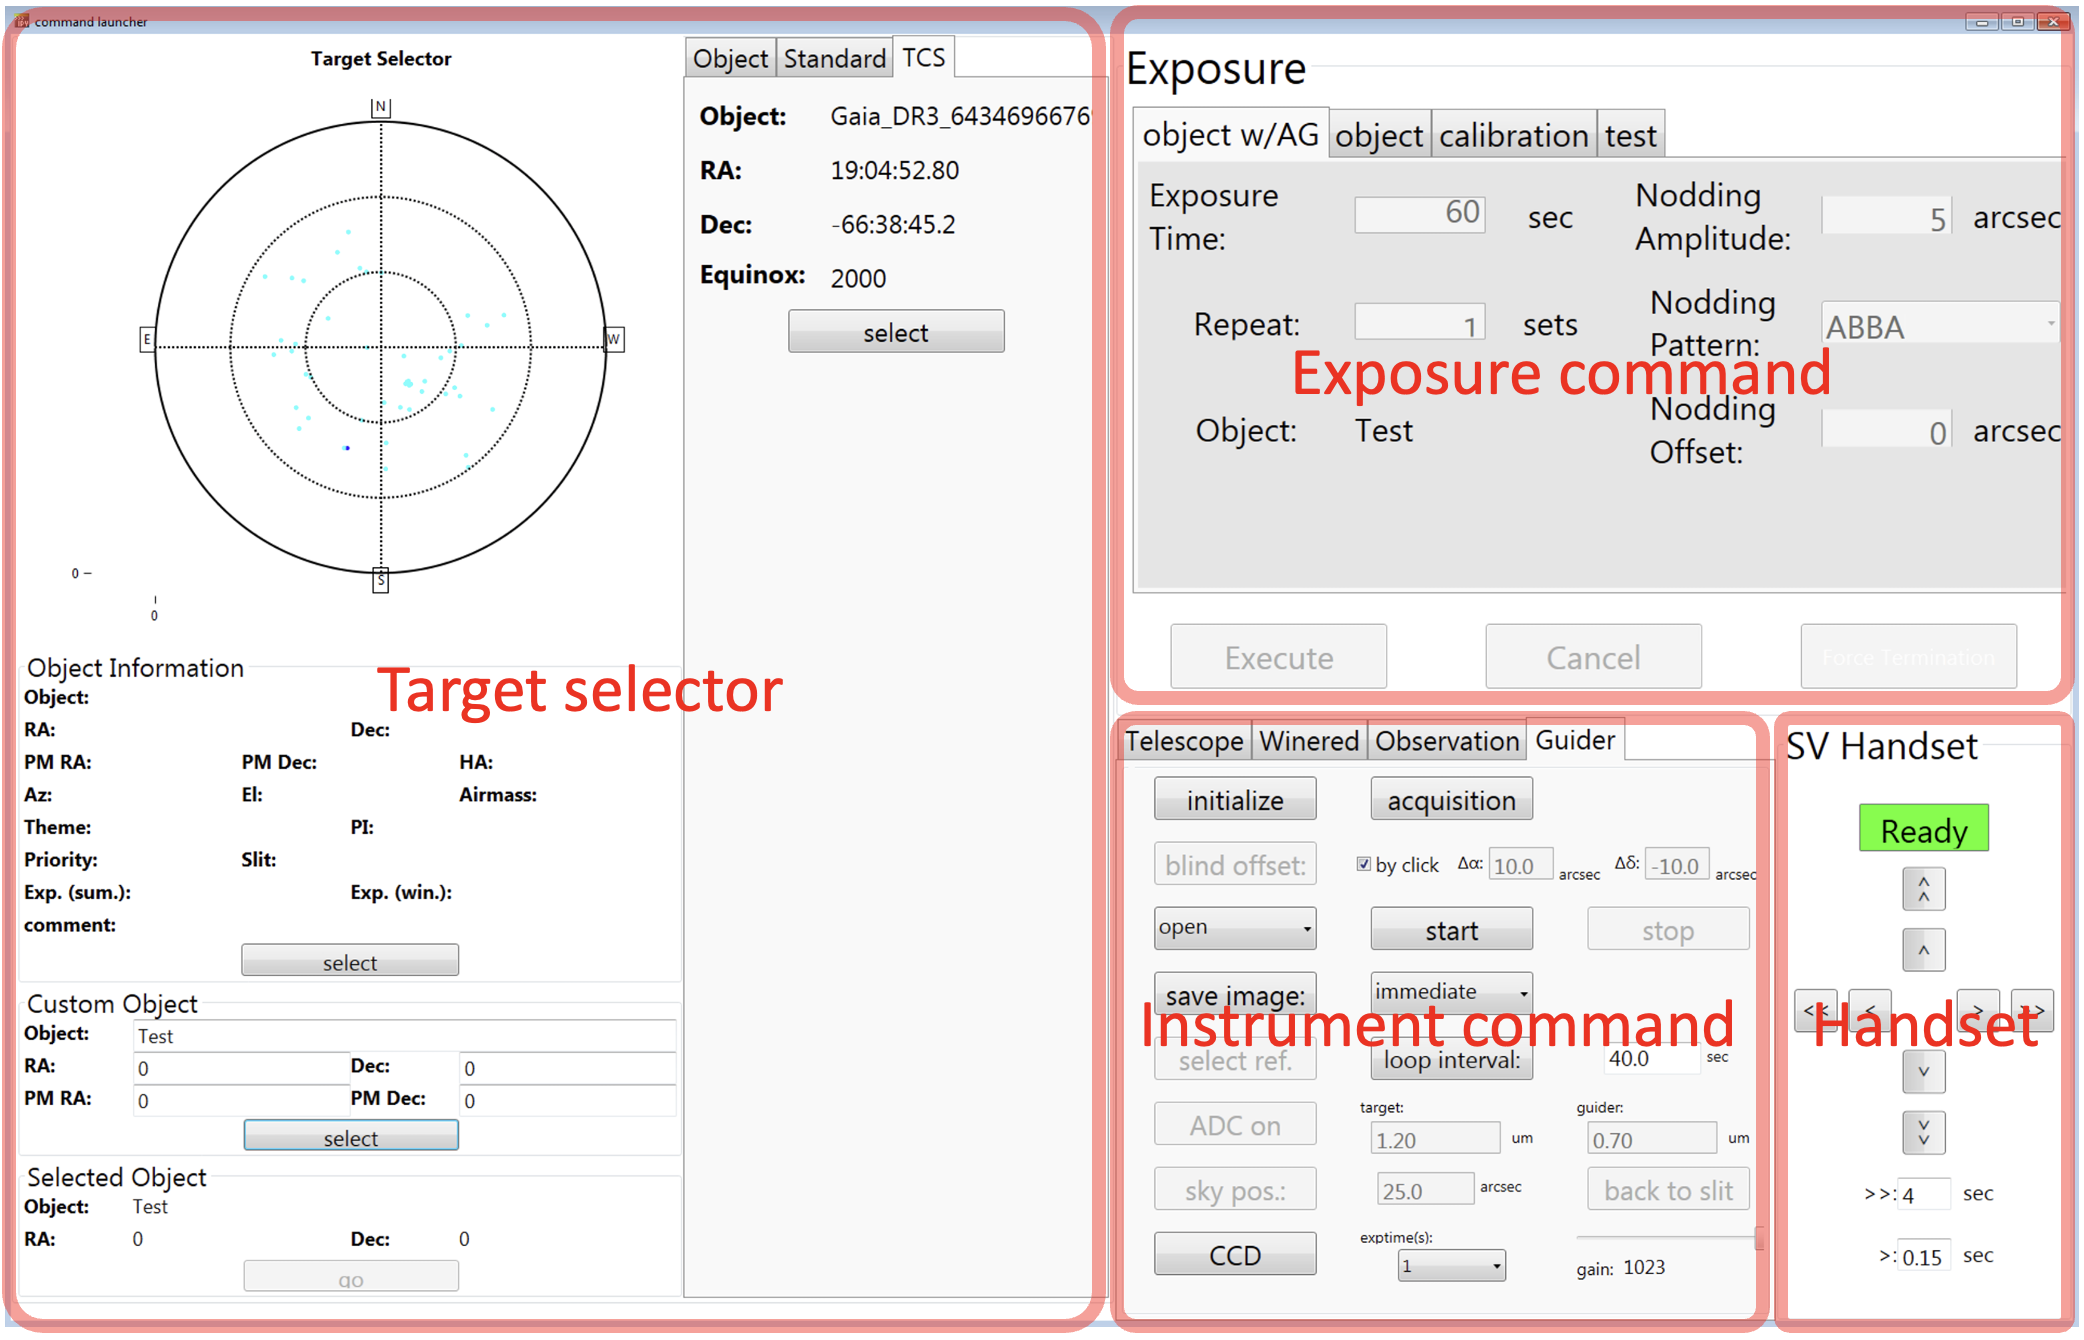
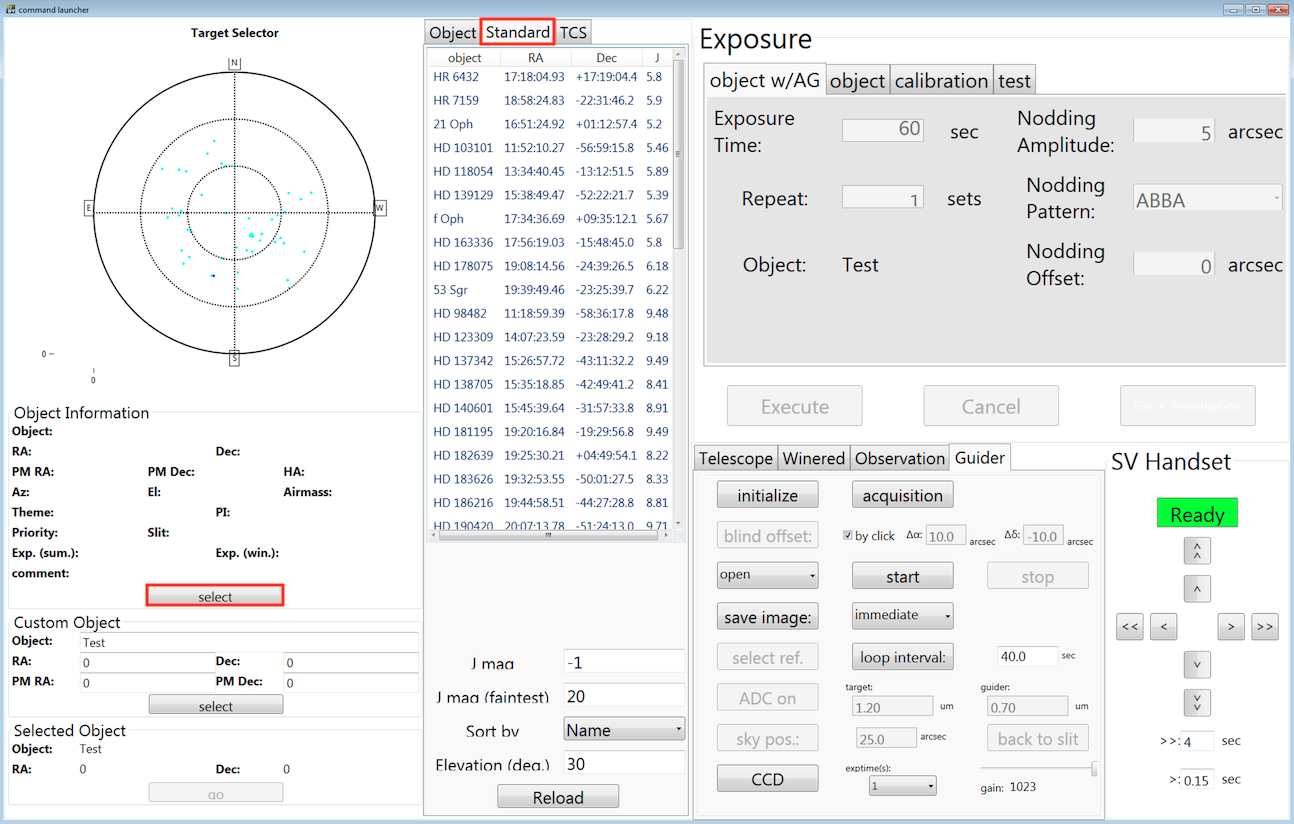
The command launcher consists of four parts as target selector, exposure command, instrument command, and handset.
Command launcher
Status monitor
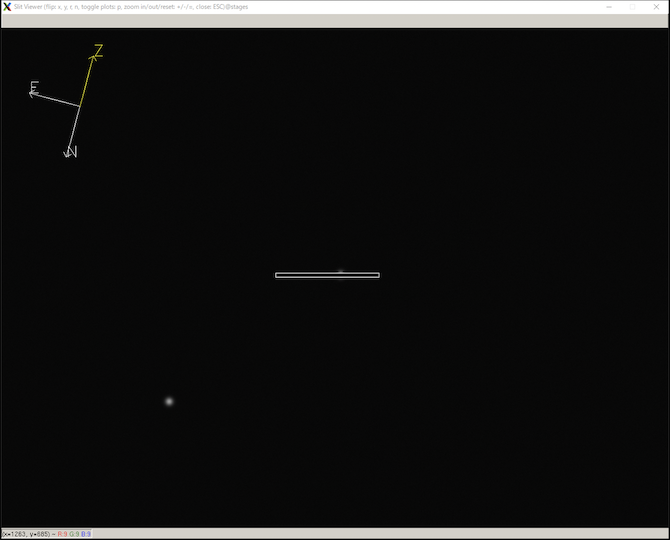
Slit viewer
Outline to take data
① Register observer name.
② Select slit width.
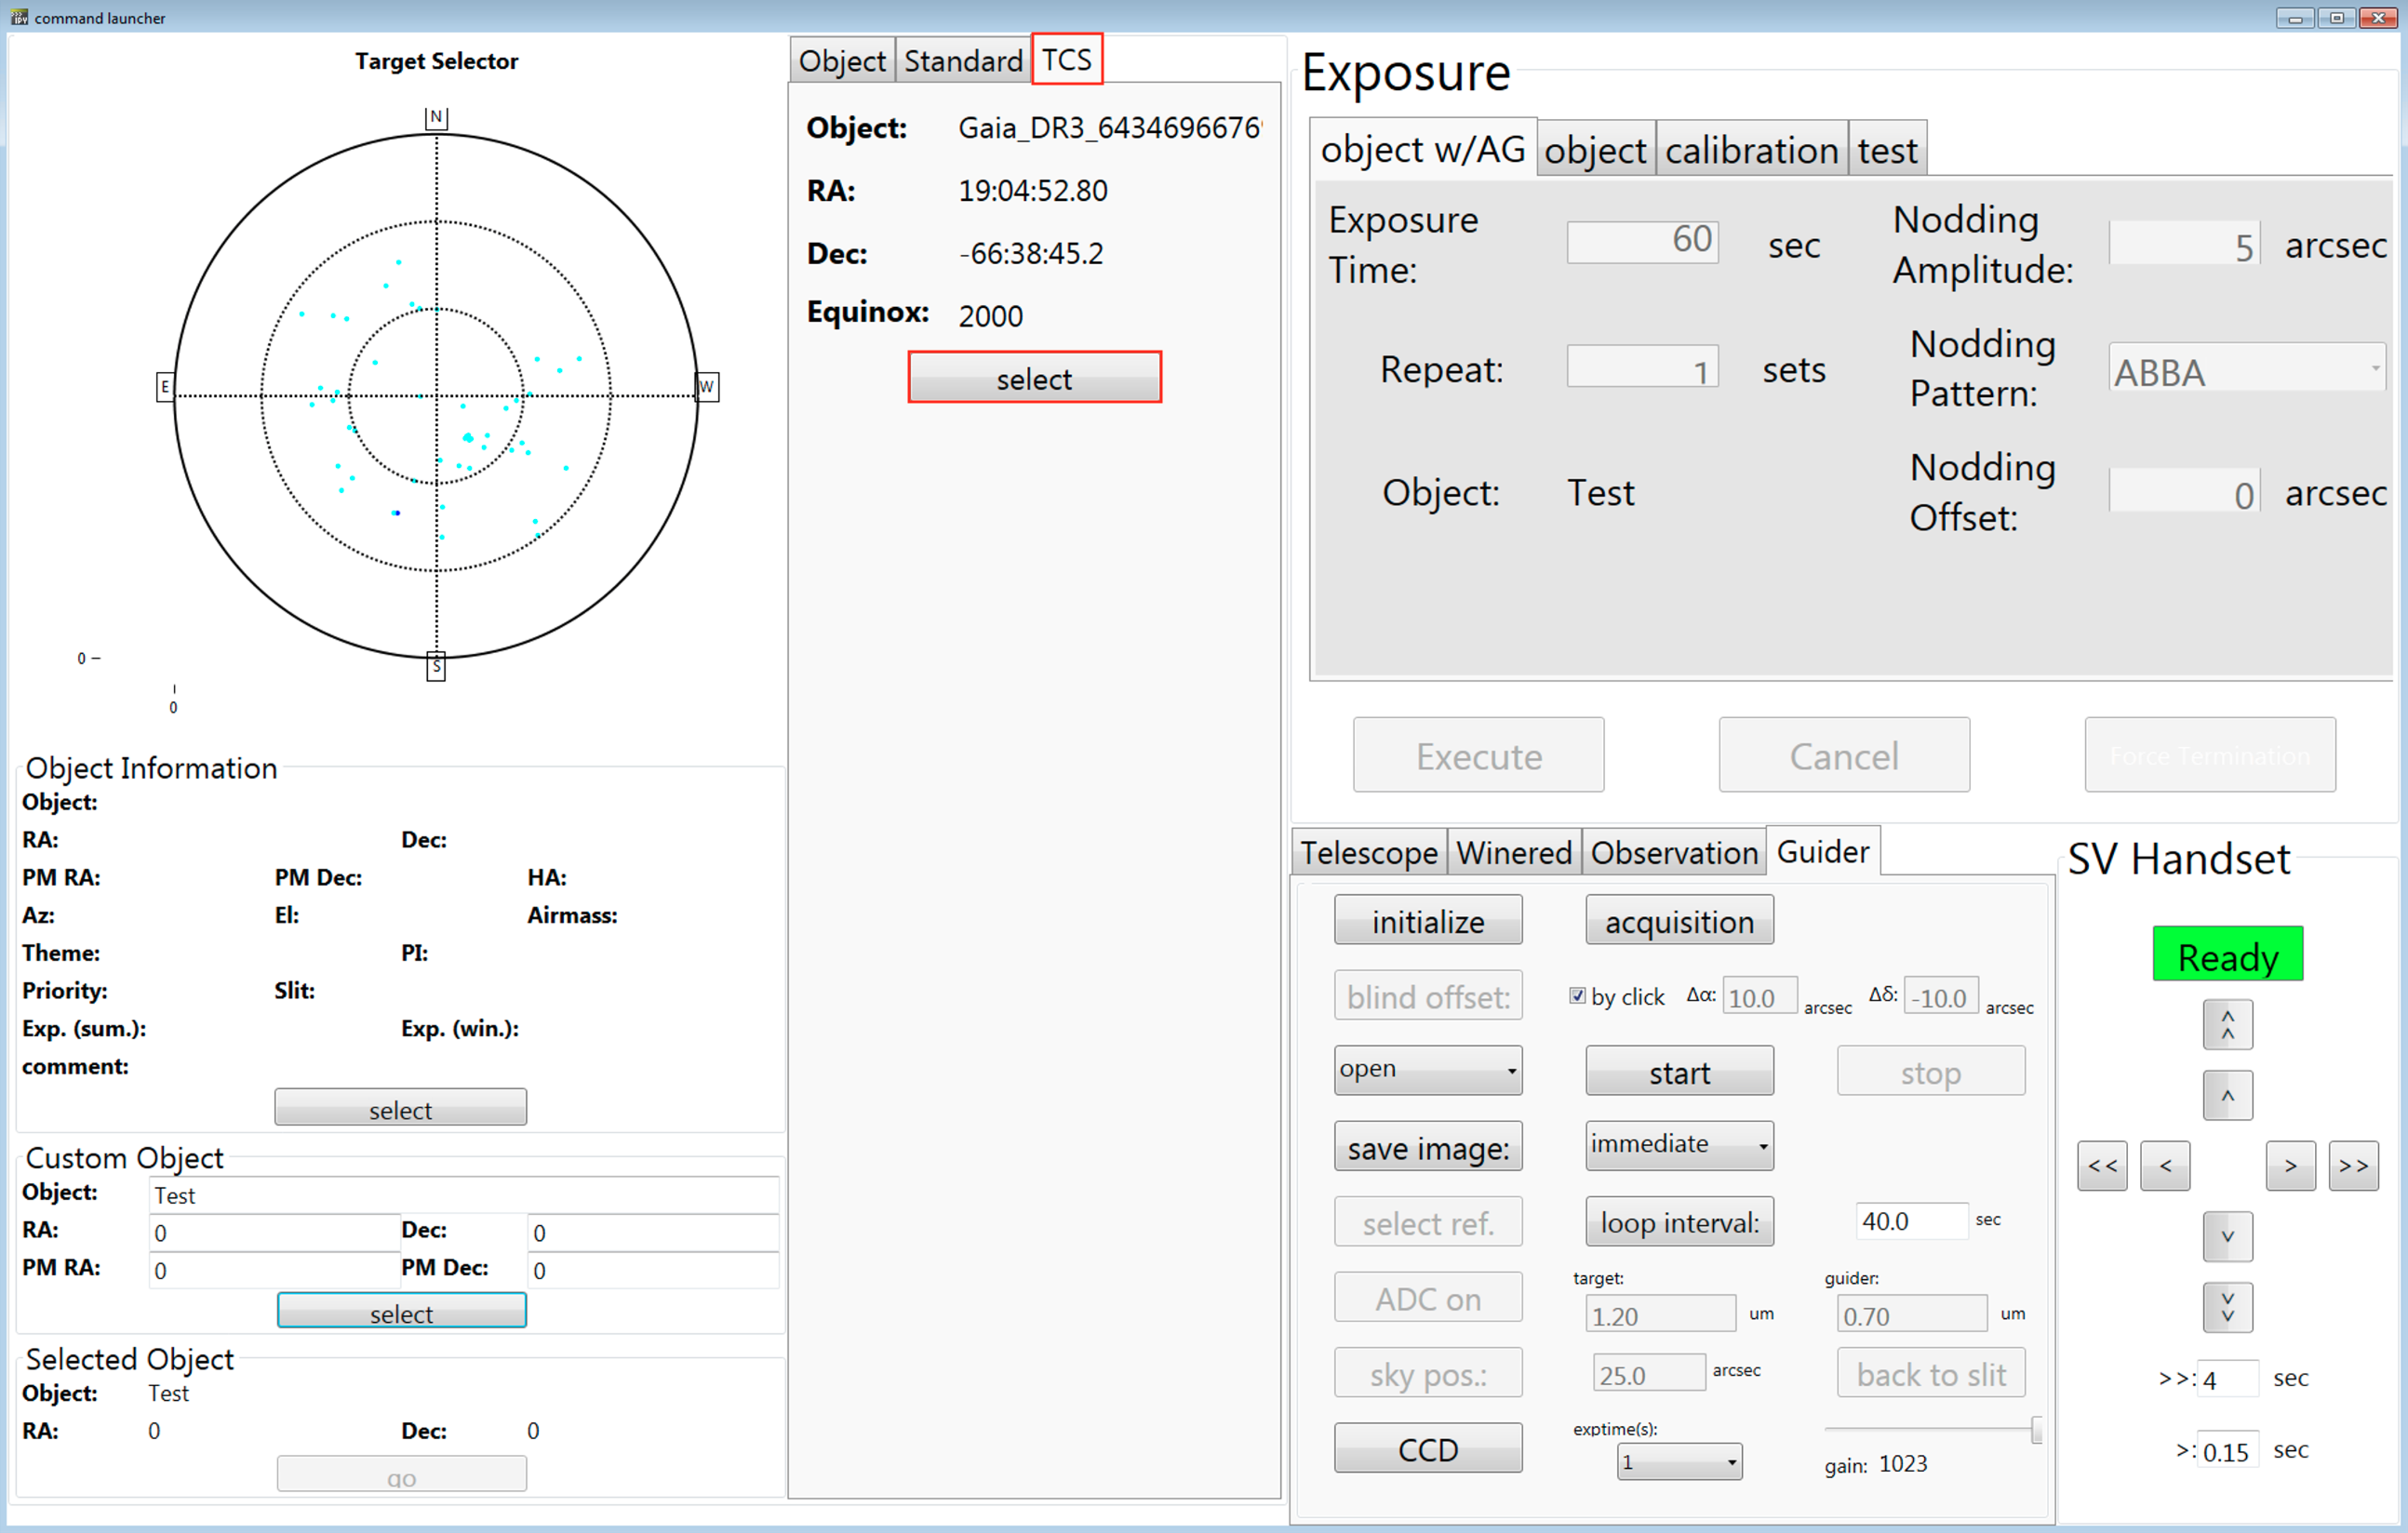
③ Select TCS tab and point telescope. (③' When standard tab is selected, select button should be clicked after selecting a target.)
④ Start guiding.
⑤ Set exposure paramteres.
⑥ Execute.
Observer name registration
Please fill observer name in the Observation tab in the instrument command part. The filled name will be saved in the fits header.
Observation tab
Slit width
Select a slit width by the following steps (the slit length is fixed to 9.0").
Select the Winered tab in the instrument command part.
Select the desired slit width from the pull-down menu.
Click the Go button.
Winered tab
Physical size (μm)
sky-projected angle (")
100
0.29
140
0.40
200
0.58
400
1.16
Pointing Telescope
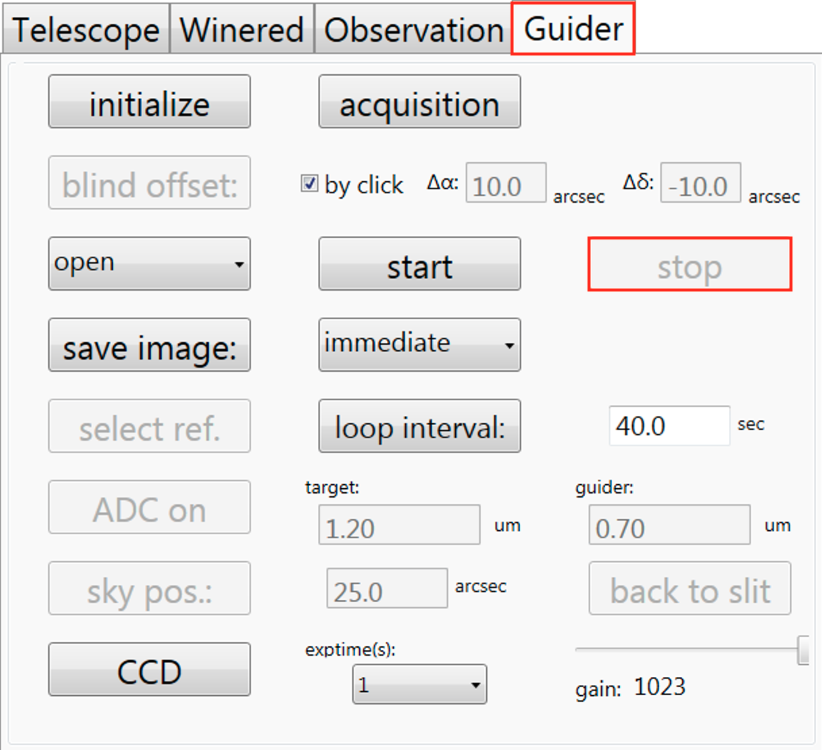
If the WINERED guiding system is working, please stop the guding system by clicking the stop button in the Guider tab in the instrument command part before moving the telescope.
Guider tab
Objects in observer's own list
Select the TCS tab in the target selector part, and then, ask the telescope operator to point the telescope to the target.
When the TCS tab is selected, target name selected in the Magellan TCS and the coordinate at the time of starting exposure will be saved in the fits header.
Object: column in the exposure command part displays the target name by clicking select button in the Target selector part (or, when the Executed button is clicked).
Fine-tuning of the pointing direction can be conducted by SV Handset. A click offsets the pointing direction in such a manner that the target moves in the selected direction in the SV coordinate.
Command launcher
Objects in the WINERED standard list
Observer can use the standard star list prepared by the WINERED team by selecting the Standard tab in the target selector part. Data taken in the following steps will be shared with other observers.
Select the Standard tab (information of registered targets are shown in the column and their positions are displayed in the celestial chart).
Targets to be displayed can be narrowed down by entering values J mag (brightest), J mag (faintest), Elevation (deg.) (click the Reload button to reflect the criteria).
Tips in the celestial chart
Select region: drag a region with the middle mouse button
Pan : click the right mouse button
Zoom in/out: scroll the mouse wheel
Reset zoom: press 'a' key
Note: The celestial chart displays target positions at the time of clicking the Reload button. Click the button to display current positions.
Click a name in the column or a point in the celestial chart (information of the selected target is shown in the Object Information box and its position in the celestial chart is marked in red).
Click the select button (the target name is reflected to the Object w/AG tab in the exposure command part).
Be sure to click select button before the first exposure in order to reflect the target information to the fits header.
Command launcher
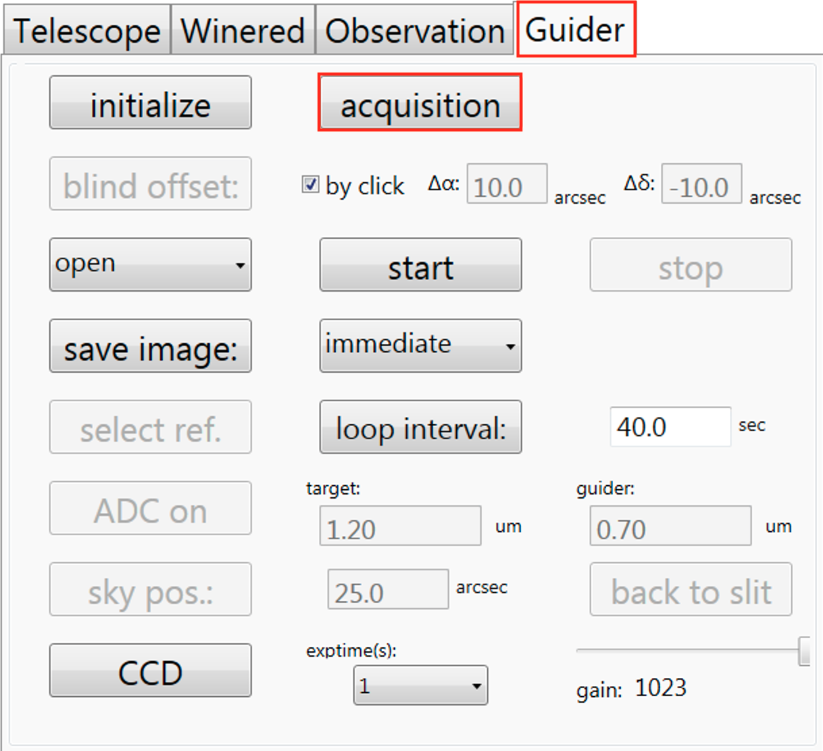
Acquisition
To shift the target position on the slit center, the acquisition procedure (acquisition button in the Guider tab) is used.
The on source or open mode of the WINERED auto-guiding system (see the next section) will be automatically started after the acquisition procedure (the off source mode requires additional procedures to shift the pointing direction).
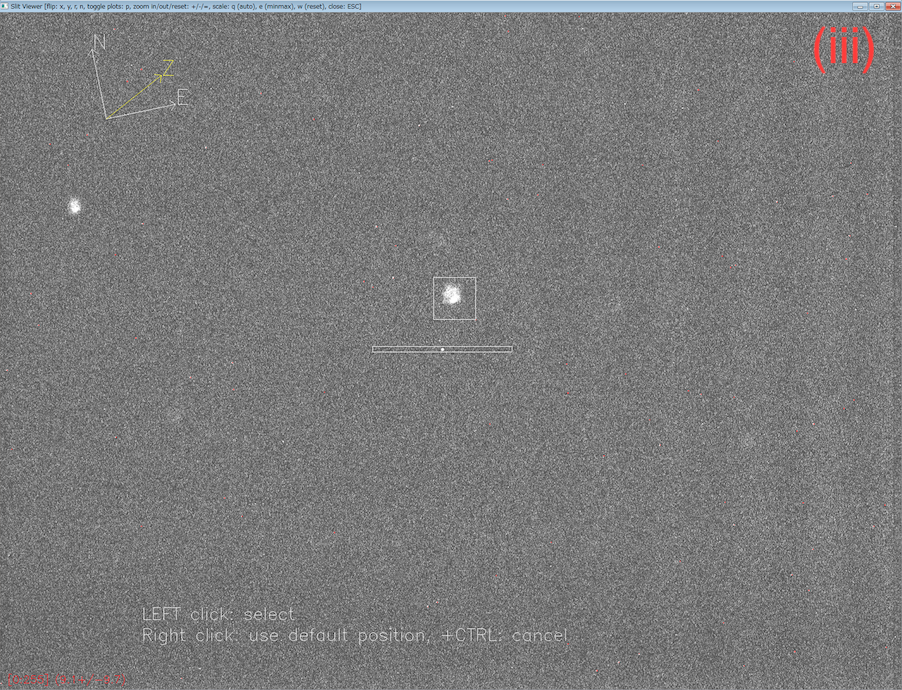
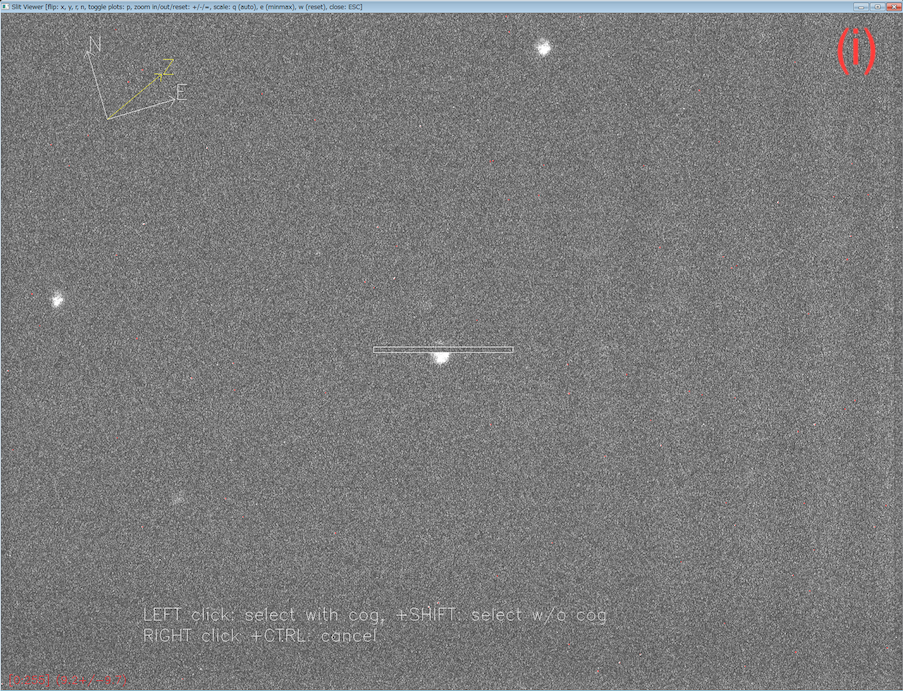
Instructions to select a star will be shown in the slit viewer image.
The detailed procedures for the acquisition and each guiding mode are below.
Guider tab
acquisition
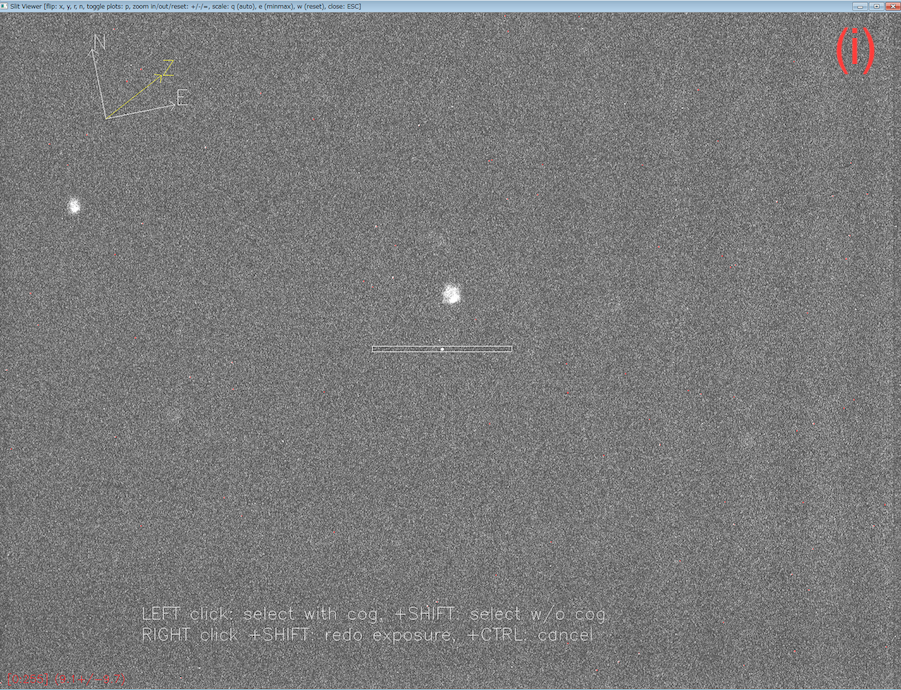
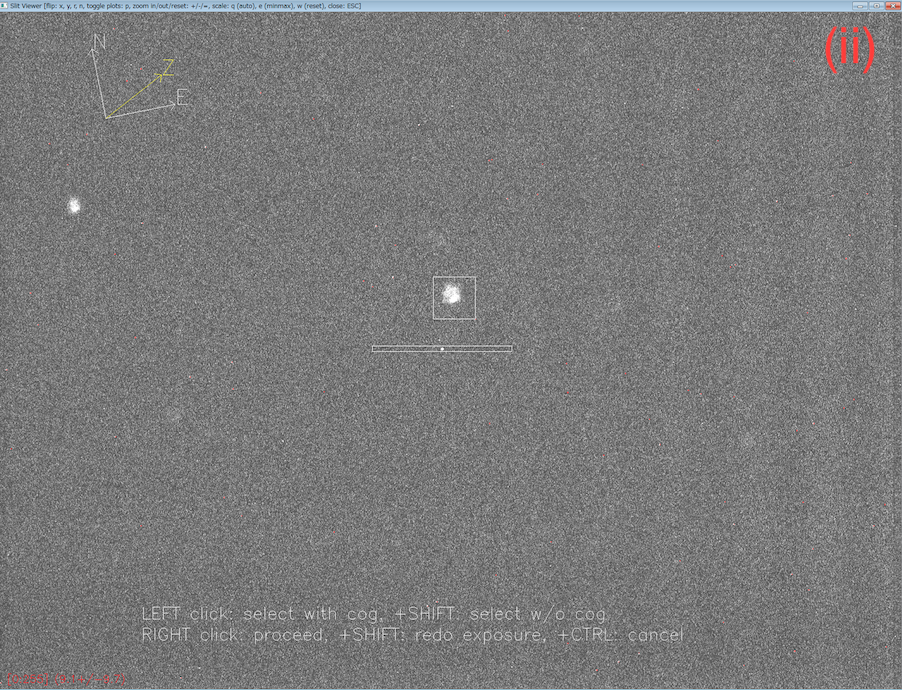
Clicking the acquisition button starts the process to select the target (i).
Select the target by LEFT click (the center of gravity will be detected and marked by the guiding system; i → ii).
LEFT click: On source guiding will be started after the acquisition procedure.
LEFT click with pressing Shift key: Open guiding will be started after the acquisition procedure.
Proceed to the next step by RIGHT click (ii → iii). Or re-select another target by LEFT click.
RIGHT click executes the shift and start on source or open guiding (iii → iv).
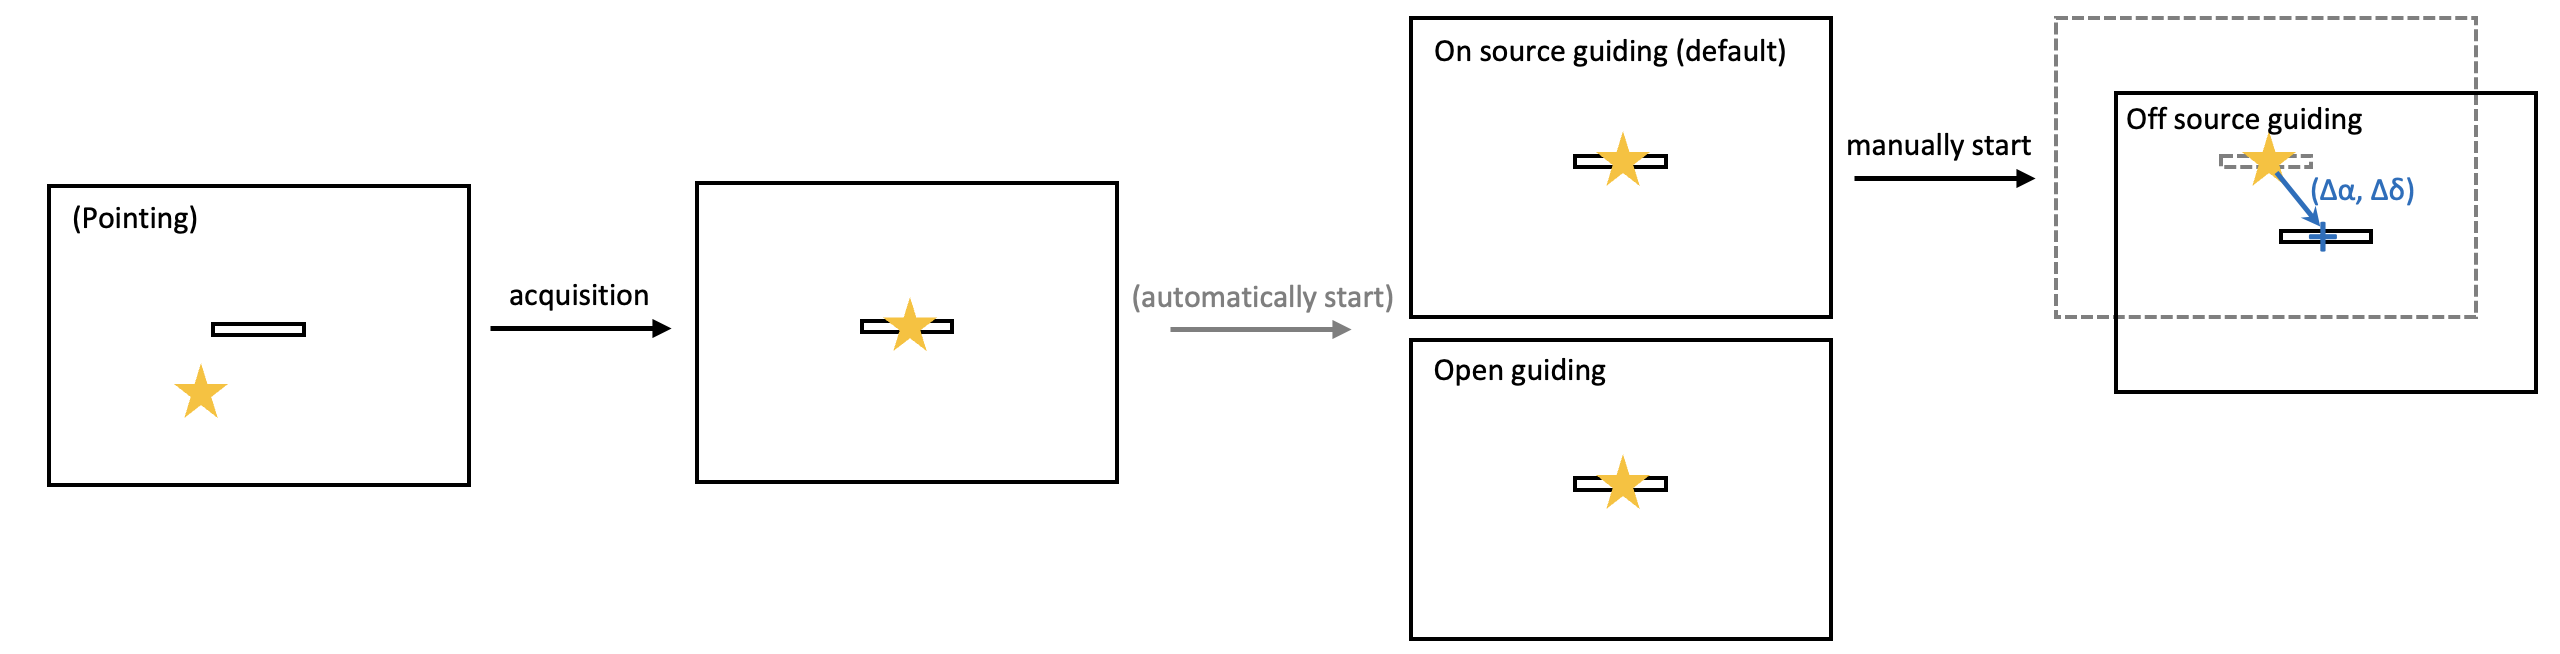
Target Guiding
WINERED (set on the NASE port) has no image rotator. The position of a target is kept on the desired positoin in the slit by the WINERED auto-guiding system, which utilizes the slit-viewer (sensitive to wavelengths of 0.6—0.9μm). The guiding system sends commands to the Magellan TCS to cancel out the movement of the slit position in the telescope FOV, but please note that the apparent rotation arround the target do not canceled out (this could be a problem for observing extended sources or binary stars). The guiding system offers following three guiding modes.
On source This mode is a closed-loop guiding which uses the target star for estimating the guiding error. When the target star is sufficiently bright, the leakage light on the upper and lower sides of the narrow slit can be seen. This mode estimates the current center of gravity of the target star from the flux ratio of the upper and lower leakage light, which results in a slight guiding error especially in a bad (and maybe an extremely good) seeing night because the psf of the target source is assumed with a profile in a moderate seeing.
Off source This mode is a closed-loop guiding which uses nearby stars of the target in the FOV of the slit-viewer for estimating the guiding error. It is convenient in cases where the target is quit faint or an extended source as the on-source guiding is not available.
Open This mode is the open-loop guiding which does not correct positional deviations due to guiding errors.
The on source or open mode will be automatically started after the acquisition procedure (see the previous section).
The off source mode requires additional procedures to shift the pointing direction.
Instructions to select a star for off source guinding will be shown in the slit viewer image.
The detailed procedures are below.
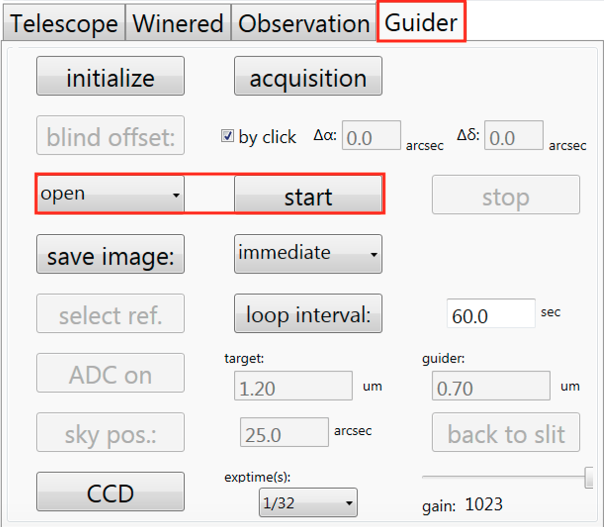
Sequence to start guiding
on source / open
Method1: Automatically started after the acquisition procedure (the previous section).
Method2: Select a mode from the pull-down menu and click "start" buttom when the target on the center of the slit.
Guider tab
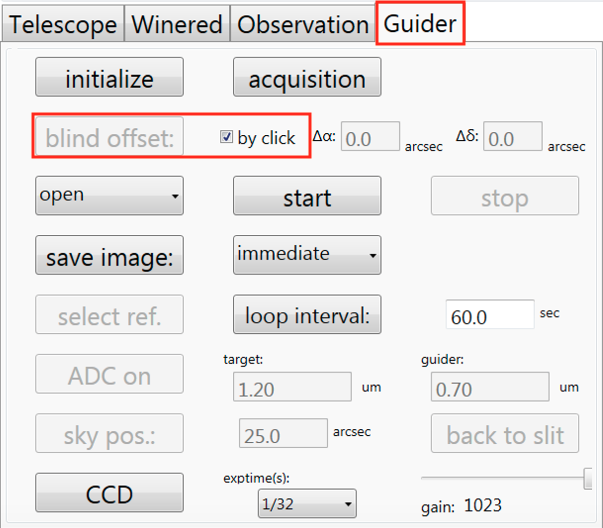
off source
Move a referece star on the center of slit by the acquisition procedure (the previous section) with the on source guiding mode.
Select off source from the pull-down menus.
Place a check mark in the by click box.
Clicking the blind offset button starts the process to select the target (i).
Select the target by LEFT click (the center of gravity will be detected and marked by the guiding system; i → ii).
RIGHT click moves the target star on the center of slit and starts off source guiding (ii → iii).
Guider tab
Note
Adjust exptime(s) of the CCD (slit viewer) in the Guider tab in the instrument command part to avoid the saturation of the reference star for guiding; select exptime(s) and click CCD buttom.
Be sure to stop the guiding system before pointing the telescope to the next observing area.
Guider tab
Exposure
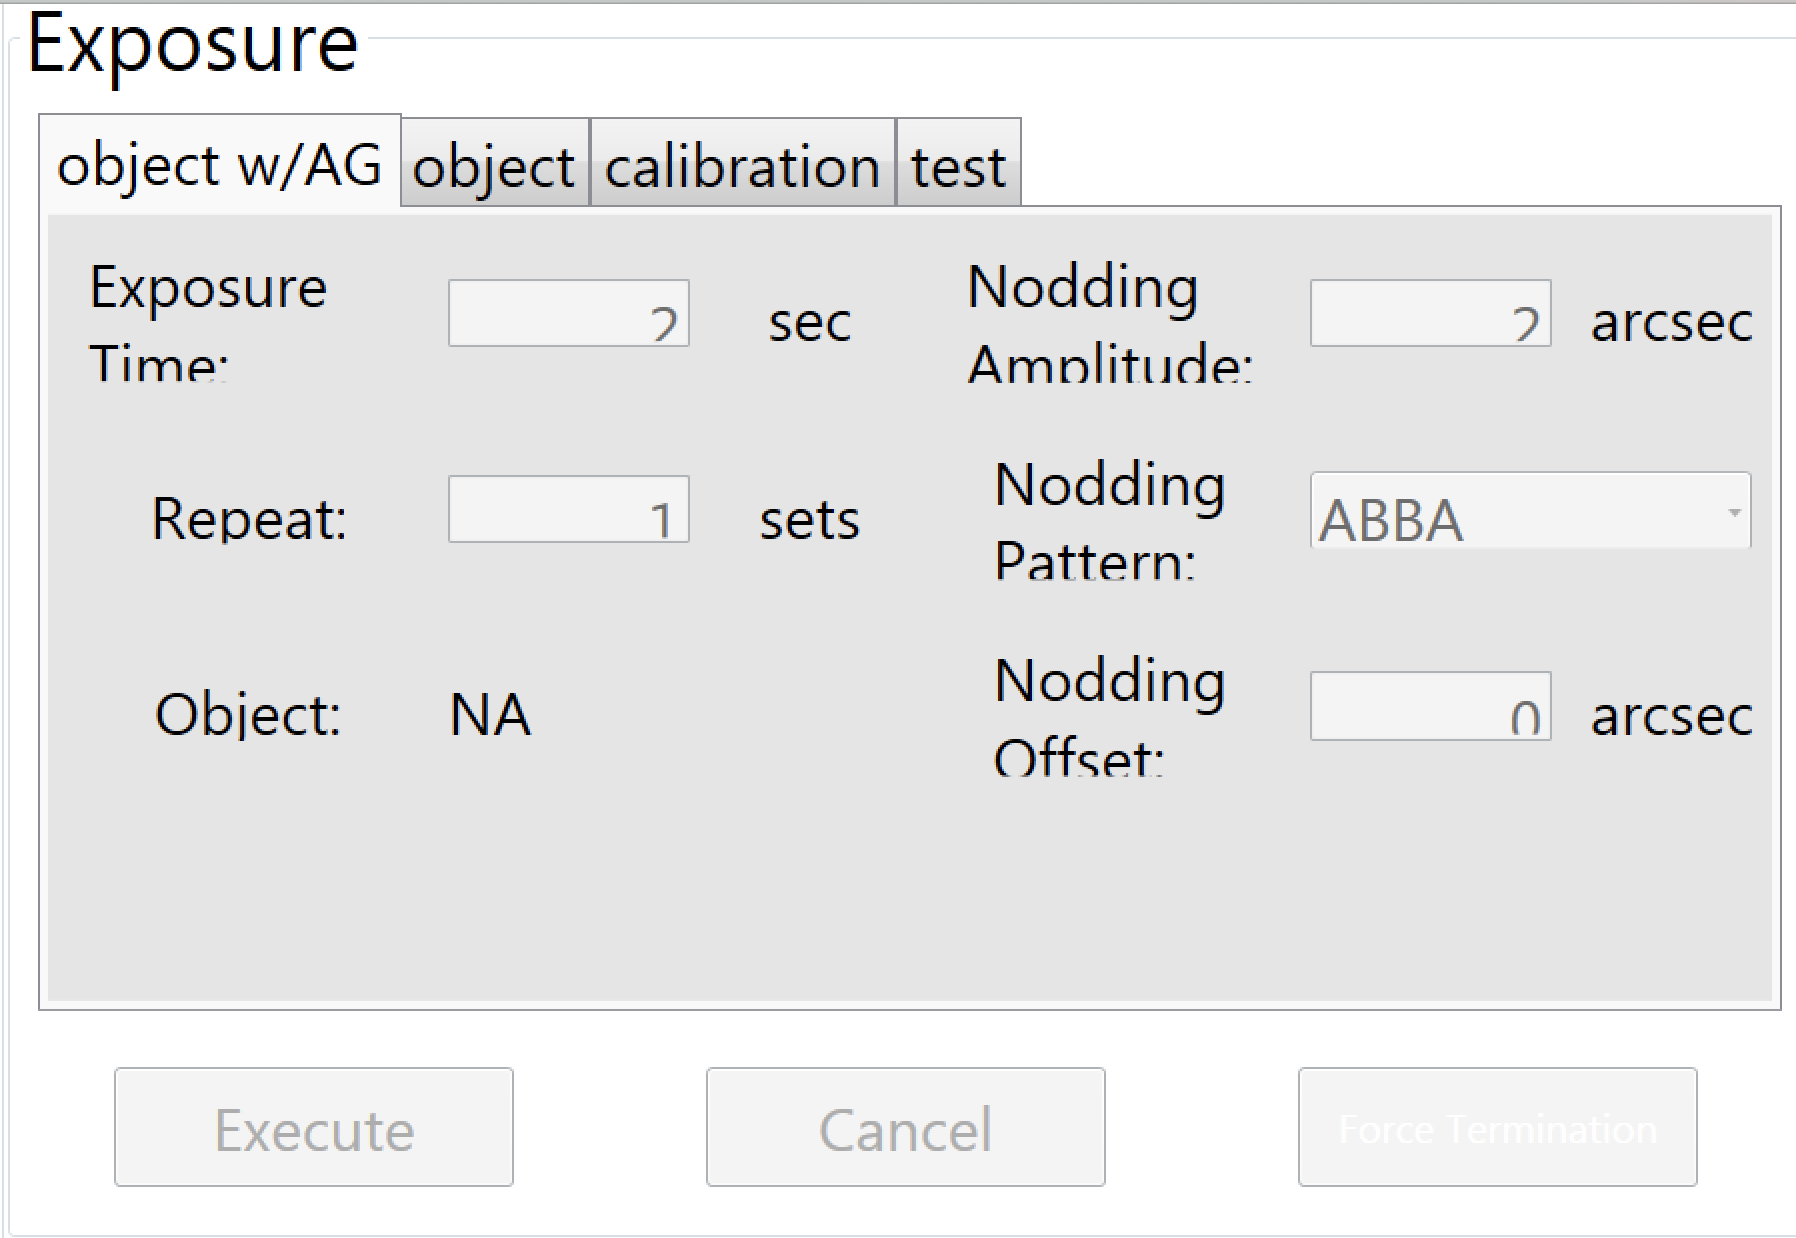
When the WINERED auto-guiding system works, sequential exposures such as ABBA and OSO can be executed in the object w/AG tab in exposure command part. Sequential observations with the guiding system working is assumed as the standard for WINERED observation. Exposures without the guiding system can be executed in the object tab, which is unavailable when the guiding system works. If observer wants to execute a single exposure when the guiding system works, please select the test tab (object name is not saved). The procedure in each tab is below.
object w/AG (standard)
Select Nodding Pattern (ABBA, AB, BA, OSO, OS).
Fill parametes.
Click Execute button.
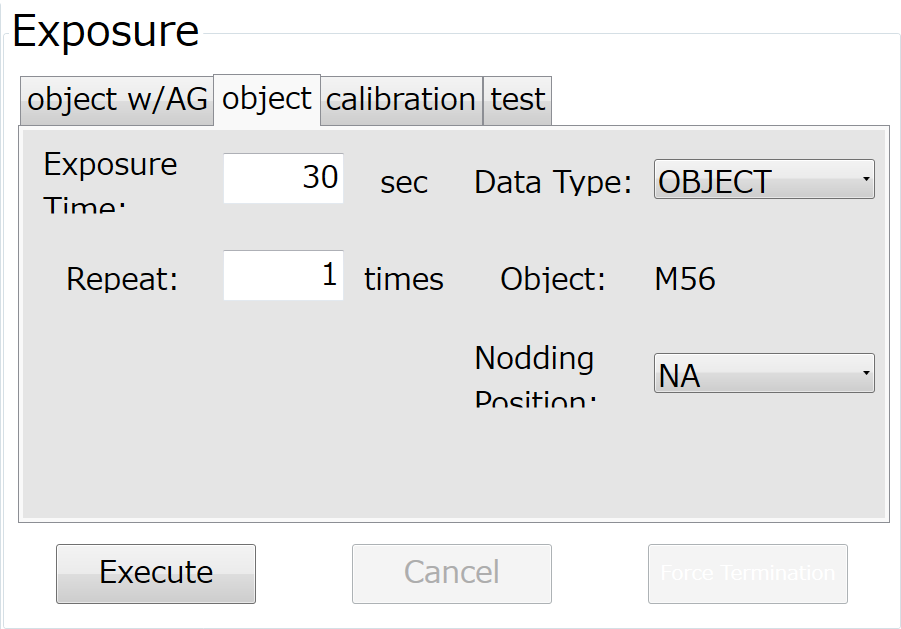
object
Select Nodding Position.
Fill parametes.
Click Execute button.
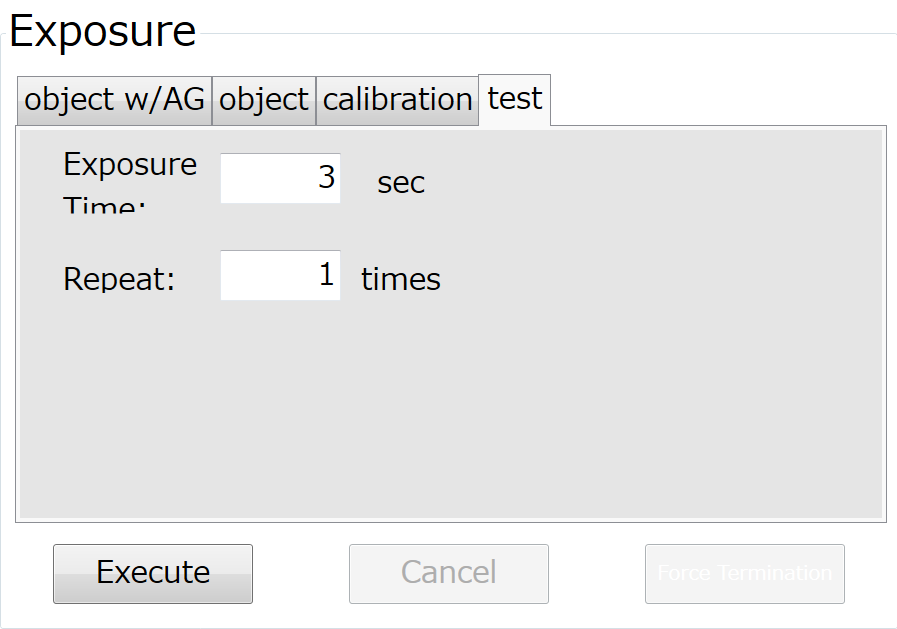
test
Fill parametes.
Click Execute button.
Note
The available exposure time is in the range of 2—900 s.
Cancel button: Cancel the remaining exposures after the on-going exposure is finished.
Force Termination button: Stop the on-going exposure and cancel subsequent exposures. If this command is executed, the instrument team needs to check the status of the detector, causing a time loss (a couple of minutes). Please ask the instrument team before execution.
Object: column displays target name selected in the Magellan TCS, when the Executed button is clicked or by clicking select button in the Target selector part.
object w/AG tab
object tab
test tab
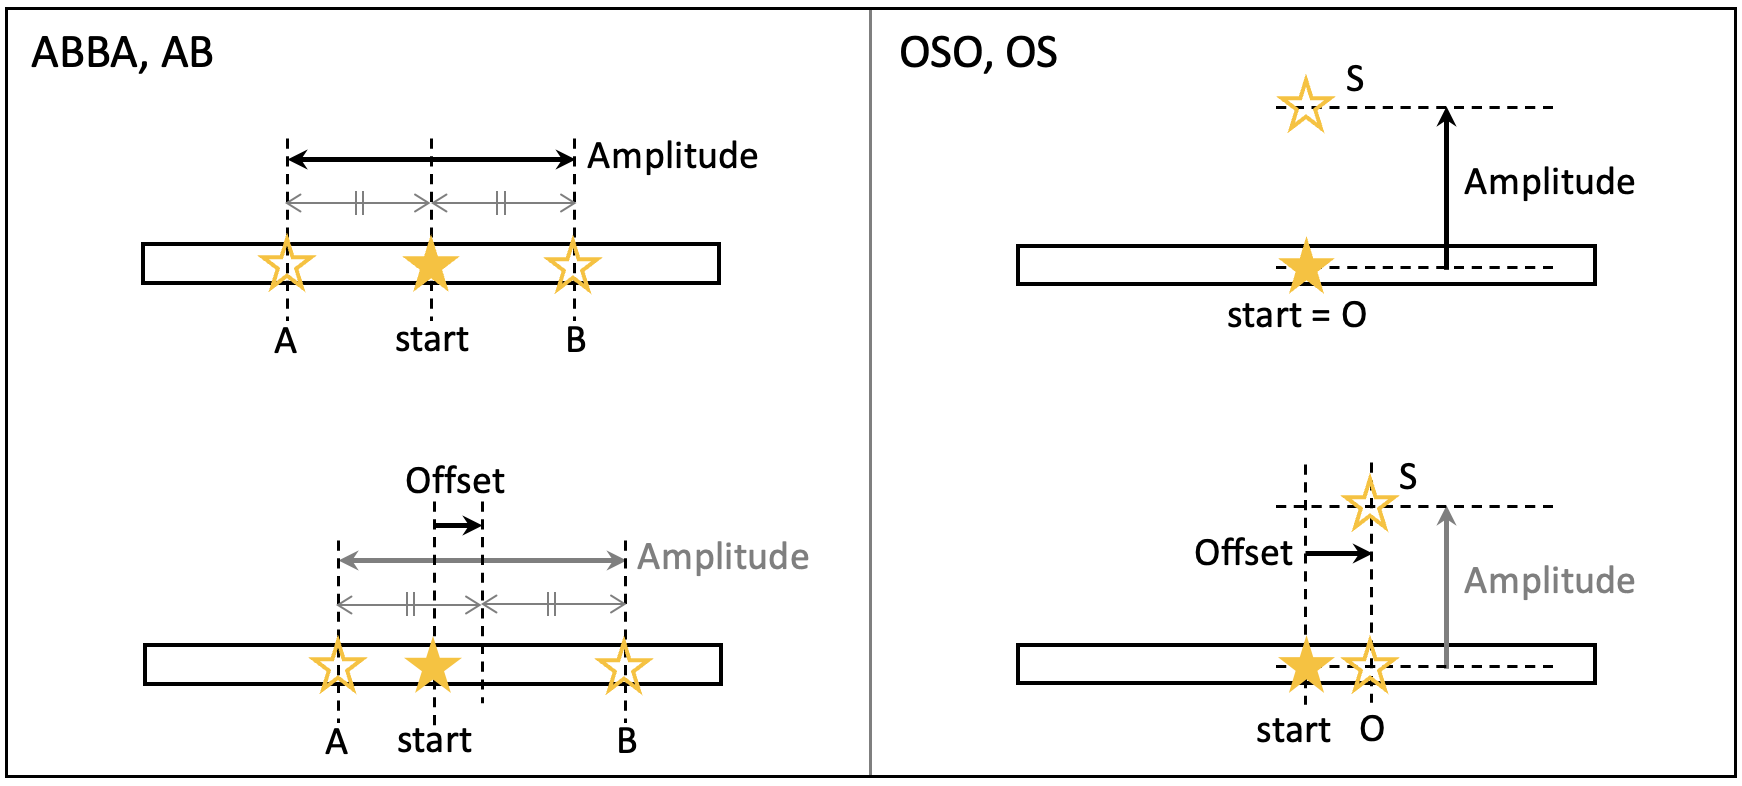
Nodding positions and patterns
ABBA, AB The star dithers two positions in the slit (one is named the “A” position and the other is named the “B” position). The change in these positions and the starting of exposure are automatically done until the dithering in the designated times is finished. A frame of the “B” (“A”) position can be used as a sky frame for a frame of the “A” (“B”) position. Therefore, the “A” and “B” positions must be adequately far from each other so that the wings of the stellar PSFs do not overlap. For an extended source for which the “ABBA” dithering cannot be applied, observers alternatively can use the “OSO” mode.
OSO, OS This mode repeats the nodding of the telescope and the exposure in designated times between the target position (the “O” position) and the sky position (the “S” position). The sky position can be optionally specified within the FOV of the slit-viewer.
Nodding positions and patterns
Note
As for ABBA, AB:
The slit length is 9.0".
An often-used nodding amplitude for ABBA mode is 5".
Please set nodding parameters considering the seeing and the influence of the image persistence due to the detector.
As for OSO, OS:
The slit viewer size is 0.9' (w) x 0.7' (h).
Often-used nodding amplitudes for OSO mode are in the range of 10—15".
The star used for guiding should be in the FOV of the slit viewer when the on source or off source guidings are used. “O” position outside the FOV of the slit viewer is available when the open guiding is used, but it should be in the FOV of the telescope.
Quick Look
Raw image (echellogram) is displayed by ds9 automatically after an exposure is finished. If ds9 is closed or is not updated, please ask the WINERED team. The way to take a quick look at spectra data is under construction.
Calibration Data
Calibration data will be taken by the WINERED instrument team.